


close
Choose Your Site
Global
Social Media
Views: 0 Author: Site Editor Publish Time: 2025-08-18 Origin: Site

Installing putting green turf in your backyard provides a fun and practical way to enjoy golf at home. With putting green turf, you can create a smooth, attractive surface that looks great year-round. This type of turf is low maintenance and helps save water. Many homeowners choose putting green turf for their backyard putting greens because of its professional feel and easy care. You don’t need special skills to get started—just follow the right steps, and you’ll have a beautiful, long-lasting space to enjoy.
Pick a flat spot that drains well and gets sunlight. This helps your putting green stay healthy and look real.
Make a strong and even base. First, take out the grass. Then, press down the soil. Add a weed barrier to stop weeds later.
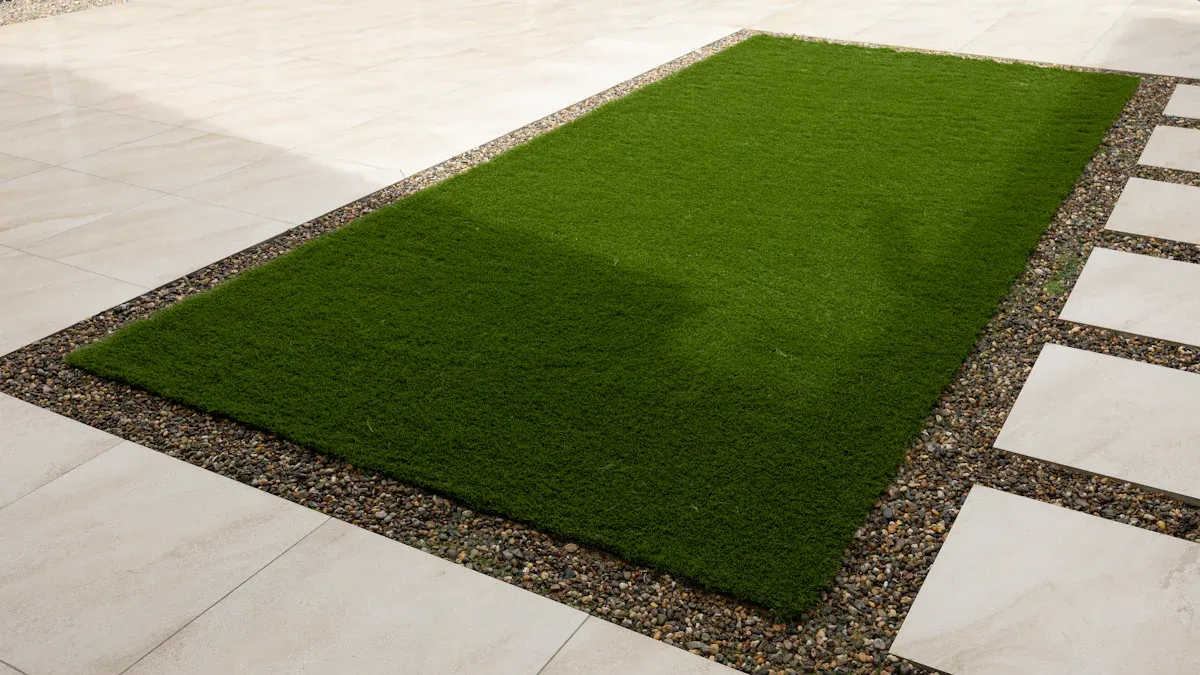
Put down the turf with care. Line up the seams so they match. Secure the edges to keep the surface smooth. This helps the ball roll straight.
Add infill materials to the turf. Shape the ground with small slopes. This makes putting feel real and fun.
Take care of your green often. Brush it, clean off debris, and check the infill. Fix small problems fast. This helps your green last many years.
Choosing the right spot for your backyard putting greens is the first step. You want a flat area with good drainage. This helps water run off and keeps the surface stable. Avoid places with heavy shade. Too much shade can cause debris to build up and may hurt the health of your turf. Pick a location that fits well with your landscaping so your artificial putting green looks natural in your yard.
Tip: Sunlight matters. Some turf fades if it gets too much sun, especially if it does not have UV protection. High-quality turf with UV inhibitors keeps its color and lasts longer, even in bright sunlight.
Look for a spot that gets enough sun but not too much shade.
Make sure the ground is not too steep.
Check that the area blends with your yard’s overall look.
Measure your space before you start your diy backyard putting greens project. Use a tape measure to find the length and width. Think about how you want to use the space. You can add gentle slopes, like 4% on one side and 2% on the other, to make putting more fun. Even a small green, like 15 by 12 feet, can have several holes for different shots.
Try using ghost holes first. These are temporary spots for holes. Move them around to see what works best before you cut permanent holes.
Place holes so you can putt from different angles and distances.
You can add features like a fire pit or combine your green with other play areas.
A good design helps you get a true ball roll and makes your backyard putting greens more enjoyable.
You need the right materials and tools for your putting green kit or diy putting green kit. The most common turf types are polypropylene, polyethylene, and nylon. Polyethylene feels soft and real. Nylon is tough and easy to care for. Choose a pile height that matches your needs. Shorter piles (8-12mm) work best for putting. Longer piles (20-25mm) are good if you want to use the area for more than golf.
| Category | Size or Item | Cost Range (per sq. ft. or total) |
|---|---|---|
| Overall average cost per sq. ft. | Residential putting green | $4 to $40 |
| Example detailed cost for 250 sq. ft. green | Materials | $5 to $20 per sq. ft. (total $1,250 - $5,000) |
| Installation labor | $3 to $9 per sq. ft. (total $750 - $2,250) | |
| Land excavation | $50 to $200 per cubic yard (total $150 - $600 for 3 cubic yards) | |
| Total cost for 250 sq. ft. | $8.60 to $31.40 per sq. ft. (total $2,150 - $7,850) | |
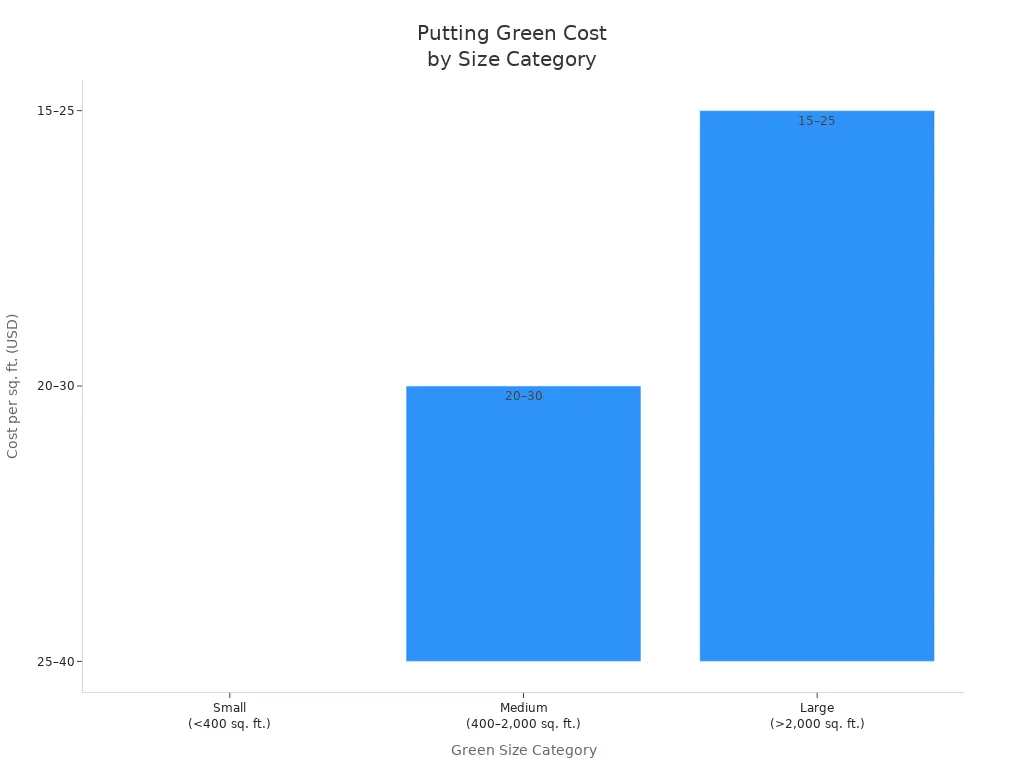
| Cost by green size | Small (<400 sq. ft.) | $25 to $40 per sq. ft. |
| Medium (400–2,000 sq. ft.) | $20 to $30 per sq. ft. | |
| Large (>2,000 sq. ft.) | $15 to $25 per sq. ft. | |
| Turf type cost | Synthetic turf | $5 to $20 per sq. ft. |
| DIY kits | $4 to $20 per sq. ft. | |
| Labor costs | Turf laying | $3 to $9 per sq. ft. |
| Additional factors | Design complexity | Can increase cost by ~10% |
Switching to putting green turf saves water. You can use up to 90% less water than with real grass. For a 1,500-square-foot lawn, this means saving about 78,000 gallons of water each year. That is like filling 312 bathtubs. You also spend less time on upkeep and enjoy a green lawn all year.
A strong base is the foundation of any successful putting green system. You want to start by shutting down your sprinkler system and stopping all watering about two to four weeks before you begin. This helps kill the grass and makes removal easier. Next, apply a weed killer to the area. This step prevents weeds from growing up through your new putting green turf.
Follow these steps for proper base preparation:
Remove about 2 to 4 inches of grass, roots, and soil. Use a sod cutter or a sturdy landscape rake for this job. Make sure the surface is smooth and even.
Compact the soil with a plate compactor. This step stabilizes the ground and prevents future settling.
Lay down a geotextile fabric or weed barrier. This layer stops weeds from growing and separates the soil from your base material.
Add a base layer of Class II road base or decomposed granite. Spread it evenly to a depth of 2 to 3 inches.
Compact the base thoroughly. Move the compactor in circular motions and pay close attention to the edges.
For a smooth putting surface, add a thin layer of decomposed granite on top and compact again.
Grade and level the base carefully. Avoid dips and bumps, as these can affect drainage and ball roll.
Tip: A well-prepared base prevents water from pooling and keeps your turf stable for years.
Once your base is ready, you can start laying the putting green turf. Roll out the turf over the prepared area. Make sure the grain of the turf faces the direction you want your putts to roll. Let the turf sit in the sun for a few hours. This helps it relax and makes it easier to handle.
Trim the turf to fit your design using a sharp utility knife. Cut around curves, landscaping features, and cup holes with care.
If you need to join two pieces, align the seams carefully. Use seam tape and adhesive to connect them. Avoid overlaps or stretching, as this can ruin the look and feel.
Place the turf so it sits flat and smooth across the entire surface.
Note: Accurate trimming and seam alignment are key for a professional finish and true ball roll.
Securing the turf keeps it in place and prevents shifting over time. Start by anchoring the edges with 6 to 7-inch spiral nails every 6 to 8 inches. For corners and curves, use landscape staples every 3 to 4 inches. Hammer the nails and staples in firmly, but do not damage the turf fibers.
Check all seams and edges. Make sure the turf is taut and flat.
Avoid over-nailing, which can cause dents, or under-nailing, which can lead to loose spots.
After securing, inspect the entire area for any wrinkles or raised sections. Smooth them out before moving to the next step.
Pro Tip: Regularly check for loose areas after installation. Re-secure them right away to keep your putting green system looking and playing its best.
Infill is a vital part of your putting green turf. It helps the turf fibers stand upright, adds weight to prevent shifting, and supports a realistic ball roll. Common infill materials include silica sand, acrylic-coated sand, and crumb rubber. Each type affects the feel and speed of your green.
Spread the infill evenly across the turf using a drop spreader or stiff broom.
Brush the turf to help the infill settle and lift the fibers.
Apply infill in thin layers, checking the depth as you go. Too much infill can slow the ball, while too little can cause wrinkles.
For a professional look, shape the surface by adding gentle slopes, breaks, or tiers to the base before laying the turf. This step mimics the contours of real golf greens and improves drainage.
Callout: Custom shaping lets you create a green that matches your skill level and backyard space. Engineered surfaces and careful infill application give you a true ball roll, just like on a professional course.
Common Mistakes to Avoid:
Skipping the weed barrier can lead to weeds growing through your turf.
Failing to compact the base causes uneven surfaces and poor drainage.
Misaligned seams disrupt ball roll and spoil the appearance.
Rushing the process often leads to mistakes. Take your time for each step.
By following these steps, you create a durable, attractive putting green turf that performs well and lasts for years.
You might run into problems when you install backyard putting green turf. Wrinkles and shifting can happen if you do not make the base strong. If you use cheap turf, it can fade or get flat. This makes the ball roll badly and the turf does not last long. Drainage issues show up as puddles, mildew, or bugs. You may see water stay after rain or the turf dries slowly. Bad seams can make bumps or gaps. This makes the turf look uneven and hard to play on.
Tip: Check for water on the surface after heavy rain. If you see puddles, you should fix drainage or change the slope.
Here are the most common problems:
A weak or uneven base makes the turf move.
Cheap synthetic turf fades and gets flat.
Bad drainage causes water and mildew to build up.
Seams and edges that do not line up make bumps or cracks.
Weeds can grow if you skip the weed barrier.
You can stop most problems by following each step and using good materials.
You can get a smooth, pro look with some expert tricks. First, make a flat, packed base with sharp sand. Level and pack the sand a few times to stop bumps. Lay the turf and let it rest for a day before you nail the edges. Put nails every 12 inches to hold the turf down. Brush kiln dry sand into the turf to help the pile stand up and keep it flat. Use a garden roller to make the turf even.
| Step | Action | Benefit |
|---|---|---|
| 1 | Pack base with sharp sand | Stops bumps and folds |
| 2 | Let turf rest before nailing | Less wrinkles |
| 3 | Brush in kiln dry sand | Keeps pile standing |
| 4 | Roll turf with garden roller | Makes surface smooth |
Brush and roll the turf often to keep the ball rolling well. If water drains slowly, poke holes in the soil or add more sand. If problems keep happening, you might need artificial putting green resurfacing to fix how it looks and plays.
Note: Check your turf often. Fix small problems fast to keep your green looking and working great.
Keeping your backyard putting green turf clean helps it look great and play well. You should brush the turf every week or two with a stiff-bristle broom. Brush against the grain to keep the blades upright and the surface smooth. Remove leaves, twigs, and other debris using a rake, broom, or leaf blower. If you spill something, rinse it right away with a garden hose. For tough stains, use mild soap and warm water. Avoid harsh chemicals because they can damage the turf.
If you have pets, pick up waste as soon as possible. Hose down the area and spray a mix of vinegar and water to remove odors. For a deeper clean, use a turf-safe cleaner and rinse the surface well. Let the turf dry before you use it again.
Tip: Regular brushing and debris removal every week or two keeps the turf fibers standing tall and prevents matting.
Each season brings different tasks for your putting green. In spring, check for low spots or bumps. Brush any flattened blades and inspect the edges and seams. Rinse the green to remove winter dust. During summer, clear debris often and brush the turf more if it gets heavy use. Mist the surface with water to cool it down on hot days. In fall, remove leaves often with a leaf blower or rake. Pull weeds early along the edges. Before winter, brush the turf and check for any repairs. When it snows, use a plastic shovel or push broom to clear the surface. Never use metal tools or salt, and let ice melt naturally.
You can help your putting green last longer by following a few simple steps:
Choose high-quality turf with UV protection and strong backing.
Make sure the base is solid and seams are tight during installation.
Brush the turf lightly each week and do a deeper clean every month.
Check and add infill every few months to keep the surface even.
Watch for signs of wear, like matted fibers or loose seams, and fix them early.
| Maintenance Task | Frequency | Purpose |
|---|---|---|
| Light brushing | Weekly | Keeps fibers upright |
| Deep cleaning | Monthly | Removes dirt and stains |
| Infill check | Quarterly | Maintains surface stability |
| Professional check | Annually | Extends turf lifespan |
Note: Avoid placing heavy objects on the turf. This prevents flattening and keeps your green looking and playing its best.
You can install putting green turf in your backyard by following clear steps. Start with planning, prepare a solid base, lay the turf, and finish with careful shaping. Most DIYers can complete this project with patience and the right tools.
You save time and money because you do not need to mow, water, or fertilize.
The turf stays green and strong, even with heavy use or bad weather.
You help the environment by using less water and fewer chemicals.
Your yard looks great all year and is easy to care for.
A backyard putting green adds value to your home and gives you a professional golf experience every day. Take your time, follow each step, and enjoy your new outdoor space.
High-quality putting green turf can last 10 to 15 years with proper care. You should brush it regularly, keep it clean, and check for damage. Good maintenance helps your turf stay green and smooth for many years.
You need a flat, stable base for the best results. If your ground is uneven, level it first with a base material like decomposed granite. This step helps your turf drain well and gives you a smooth putting surface.
Yes, turf can get warm on sunny days. You can cool it by spraying water or choosing turf with heat-reducing technology. Lighter colors and infill also help lower the surface temperature.
Tip: Watering the turf for a few minutes cools it quickly.
Install a weed barrier fabric under your turf. This layer blocks most weeds. If you see weeds at the edges, pull them out right away. Regular checks help keep your green weed-free.


